Liferay has enhanced the workflow and content approval process significantly in it's recent 6.0 release. Liferay now supports two workflow engines - Kaleo and jBPM. Content Managers can flexible manage the content creation and approval processes.
This article is about extending Liferay Portal workflow to custom assets.
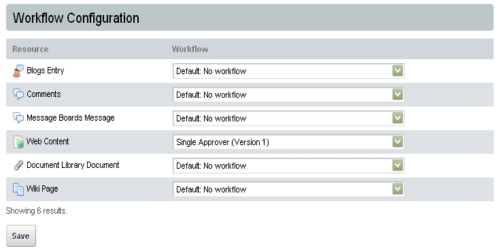
By Default, a workflow definition can be applied on six out-of-box assets like Blogs Entry, Comments ,Web Content , Document Library Document, Message Boards Message and Wiki Page as shown below.

If you would like to apply workflow definition to your custom asset or some other out of box portlet asset such as Image Gallery, then you need to follow the simple steps explained below:
- Step1 : Add following reference and column to your service.xml (service in which you would like add workflow),out of these some of fields must be there which will help in mapping between workflow tables and your custom table.
<column name="parentResourcePrimKey" type="long"></column>
<column name="version" type="int"></column>
<column name="title" type="String"></column>
<column name="content" type="String"></column>
<column name="description" type="String"></column>
<column name="priority" type="int"></column>
<column name="status" type="int"></column>
<column name="statusByUserId" type="long"></column>
<column name="statusByUserName" type="String"></column>
<column name="statusDate" type="Date"></column>
<!-- Finder methods -->
<finder name="R_S" return-type="Collection">
<finder-column name="resourcePrimKey"></finder-column>
<finder-column name="status"></finder-column>
</finder>
<reference package-path="com.liferay.portal" entity="WorkflowInstanceLink"></reference>
- Step2 : Build service to make sure there is no compile time error.
- Step3 : Once you Confirm with service just add following line in liferay-portlet.xml inside the <portlet> tag on which you wish to apply workflow.
<workflow-handler>path</workflow-handler>
- path : This is path of your own workflow handler class
- Note : This tag should before initialize of portlet.
E.x
<workflow-handler>com.liferay.workflow.ArticleWorkflowHandler</workflow-handler>
- Step4 : You need to extend com.liferay.portal.kernel.workflow.BaseWorkflowHandler
class and override four abstract methods.
- String getClassName()
- String getType(Locale locale)
- Object updateStatus(int status,Map workflowContext)
- String getIconPath(ThemeDisplay themeDisplay)
Note : Here one thing is very important updateStatus() method called another method which will be developed in Step5.
- Step5 : Now you need to implement one method called updateStatus() in you LocalServiceImpl class. which will return object of your model class.
E.x
public class DemoLocalServiceImpl extends DemoLocalServiceBaseImpl
{
public Demo updateStatus(long userId, long resourcePrimKey, int status,ServiceContext serviceContext)
{
User user = userPersistence.findByPrimaryKey(userId);
Date now = new Date();
// Article
Demo dempObj = null;
dempObj.setStatus(status);
dempObj.setStatusByUserId(user.getUserId());
dempObj.setStatusByUserName(user.getFullName());
dempObj.setStatusDate(serviceContext.getModifiedDate(now));
demoPersistence.update(dempObj, false);
if (status != WorkflowConstants.STATUS_APPROVED)
{
return dempObj;
}
return dempObj;
}
}
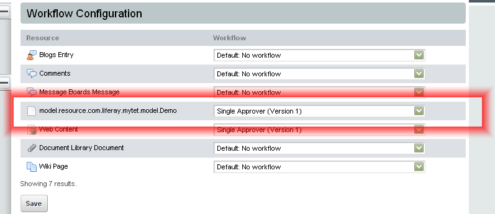
- Step6 : Now Deploy service and portlet you will find out your asset in control panel as showing below .now you can apply any definition on that.

Summary
The Liferay workflow can integrate with many workflow engines like jBPM | Kaleo. You can have configurable workflow definitions and you can apply workflow on any asset.

